
Understanding Advanced Python Part 6
 This post is the sixth part of a series on Advanced Python. In this series, we’ll take what we learned in our Understanding Python Basic series (Part One of that series found here) and expand on it to understand the more challenging parts of Python. In Part 6, you’ll be learning about Reading and Writing files in Python.
If you want to use the Nexus as your Python editor, then you will find instructions at the end of the blog on how to set this up!
Tera Tom here! Welcome to Part 6 of our lesson on Advanced Python! Before we jump into connecting to a SQL system, let’s make sure you have everything you need to follow along with this lesson. If you have a Python editor you want to use then you are all ready to go, but if you want an easy way to try these examples and more then go to www.CoffingDW.com and download the Nexus. Once you have it installed just look at the picture below and see where the Python editor of Nexus exists. If you want to install Python so you can practice with Nexus then go to the last page of this blog for detailed instructions.

The segment will be split into TWO parts. Last time, we talked about the core concepts of Reading and Writing files in Python before seeing an example of this by using a Teradata System. Today, we’ll see how these concepts work with an SQL system, as well as explore more advanced variations of Reading and Writing files to Python.
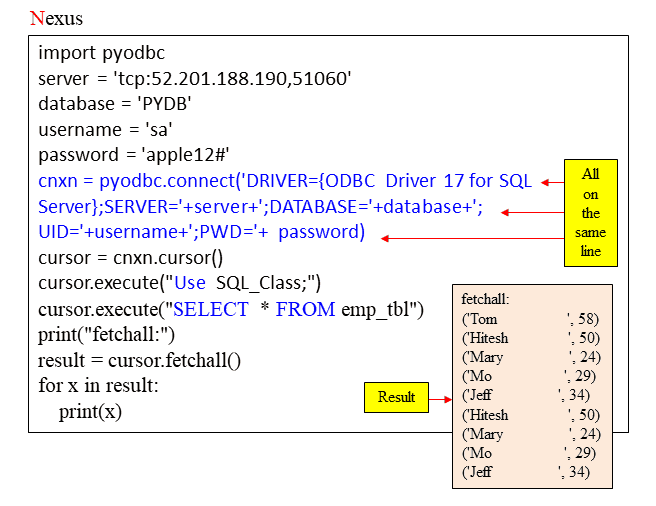
Connecting to a SQL Server Database to Create/Insert a Table
Use the below steps to connect to a SQL Server database. We also ran the use database command to set our default database to SQL_Class. We then created a table called emp_table and inserted rows inside of it.

Selecting from a SQL Server Table
Use the below steps to query a SQL Server table.
Another Way to Connect to a SQL Server Database
Use the below steps to connect to a SQL Server database. We also created a cursor and selected the version of SQL Server, which is displaying at the bottom.
 Retrieving a Single Row from a SQL Server Database
Use the below steps to connect to a SQL Server database. We also created a cursor and selected a single row.

Retrieving a Single Value from a SQL Server Database Continued
Use the below steps to connect to a SQL Server database. We also created a cursor and selected a single value from a single row, which is displaying at the bottom.

Connecting to a Database and Creating/Inserting into a Table
Use the below steps to connect to a SQLite database and run Python against it.
 Selecting from a Database Table
Use the below steps to query a database table in SQLite.
 Two Examples of Opening a CSV File
Below, we have two examples of opening a flat file.

Input Parameters as Arguments
The below example was passed three arguments and calculated the interest of $100,000 with a 3% interest rate over five years.
 A Fancier Way to Print our Interest Calculator
The below example was passed three arguments and calculated the interest of $100,000 with a 3% interest rate over five years. Notice our print command is formatted nice and pretty.

Tips – In-Place Swapping of Two Numbers
Python provides an easy way to do assignments and swapping in one line.

How to Install and Setup Python on your Nexus
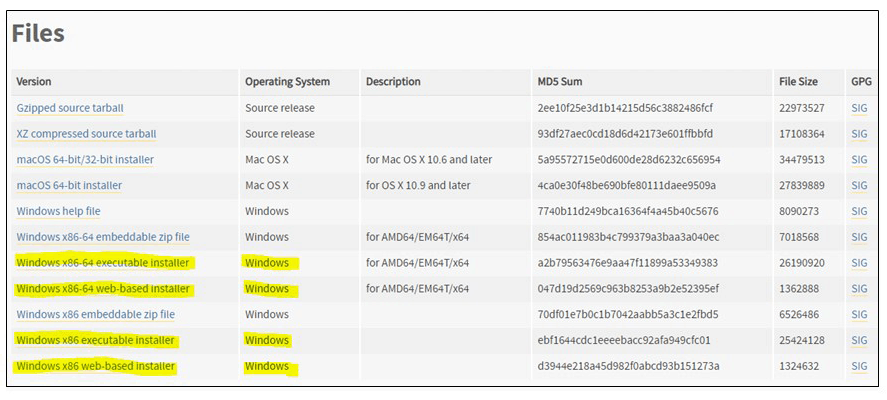
- Download the latest version of Nexus from our website. https://www.coffingdw.com/nexus-trial/
- Once installed download Python for Windows. https://www.python.org/downloads/windows/
Your version number can vary, but you will want to download the Windows installers. So for Python for Windows 3.7.3 located here (https://www.python.org/downloads/release/python-373/) you will select one of these highlighted links:
Note: Nexus comes in three versions: Nexus 64-bit, Nexus 32-bit, and Nexus WOW-64 (For 64-bit machines with 32-bit Microsoft Office installed).X86-64 can be used for the 64-bit or Wow64 version of Nexus and x86 can be used only on the 32-bit version of Nexus.
When installing, if you have the option, select “Add Python to PATH”.

If you are using an older version of Python and do not have this option, then you will need to add the path to your python executable to your PATH environment variable. Be careful when editing this variable as it can affect many Windows functionality issues. If you don’t feel comfortable about this then consult with your desktop support.
Python 3.7.3 was installed in the following directory on our PC.
C:\Users\Todd\AppData\Local\Programs\Python\Python37
You can view your Python directory by opening File Explorer and pasting in the following path:
%LocalAppData%\Programs\Python
Once you have the path to the python.exe executable then add it to your Environment PATH variable by following the direction in this link:
https://www.computerhope.com/issues/ch000549.htm
And that is how you install Python into the Nexus Query Chameleon!
Ready for more Python training? Make sure to check out Part 7 for further lessons on Advanced Python! Or, if you’d prefer Tera-Tom to come teach at your organization, contact our team for booking information.