The Art of Federated Queries

I have been in the computer business for 45 years, and I am obsessed with federated queries. Federated queries are a combination of hardware and software working together like dance partners that make it an art. A federated query joins tables together from different systems. Federated queries are the definition of accessing any data, at any time, anywhere.
I have spent the last 15 years of my career dedicated to the quest to master the federated query. There are some data scientists talented enough to join tables across all systems, but the art is allowing anyone to do it in seconds. I am going to show you step by step instructions on how to perform a federated query.
Database vendors do not allow their database to talk with other databases. So, we needed to make them talk. So, the biggest key is to create the SQL automatically for the user. To do so, we built a Super Join Builder.
I will demonstrate this by joining a table from the most powerful database and the simplest database. I will join a MySQL table with a Teradata table.
Placing your First Table in the Super Join Builder
To enter the Super Join Builder, right-click on a table you want to join in your systems tree, and from the menu choose SUPER JOIN BUILDER.
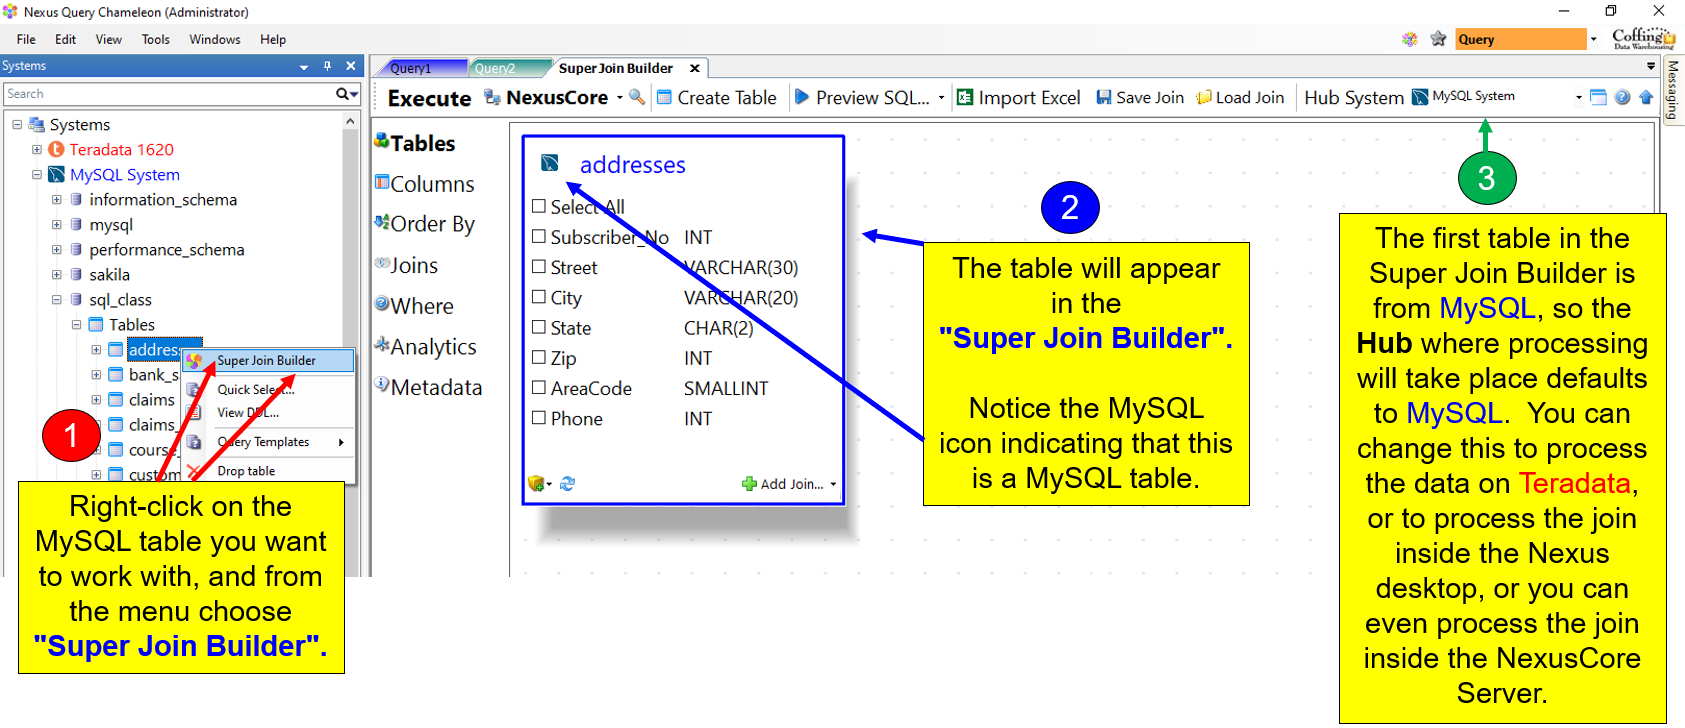
The Addresses table is now present in the Super Join Builder. We will now join a Teradata table with the name Subscribers to the MySQL Addresses table.
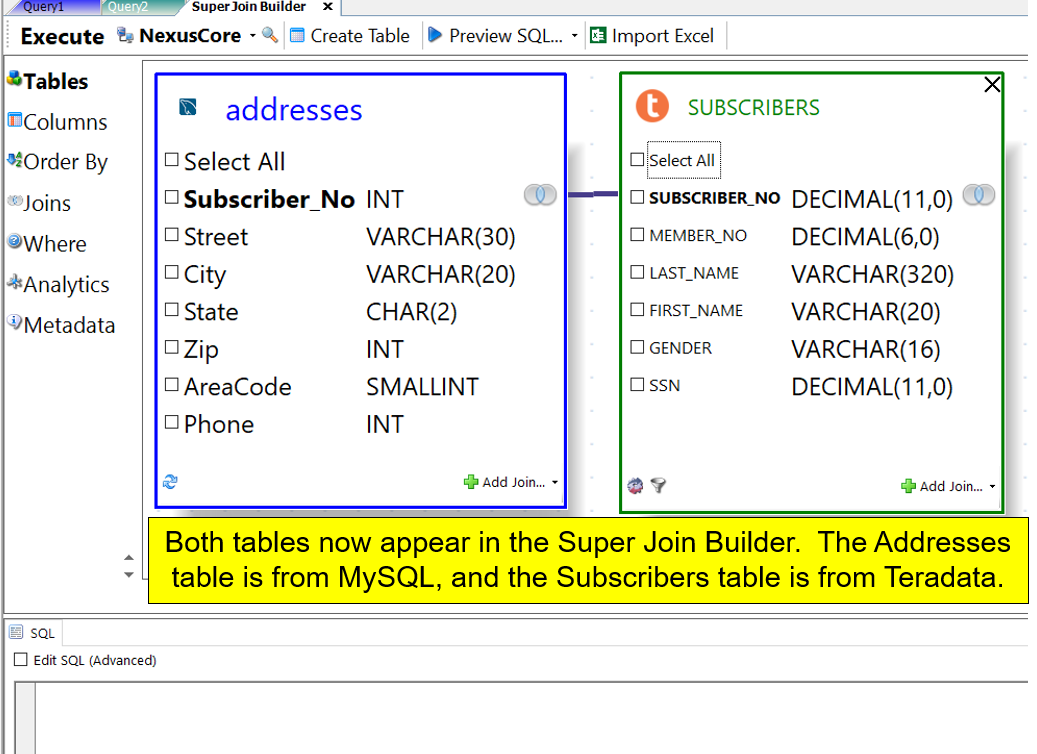
Left-click on the Teradata table you want to join to the MySQL Addresses table from the Nexus systems tree. You will drop and drag the table into the Super Join Builder. If you already have multiple tables in the Super Join Builder, you can drop the table you want to join on top of the table in the Super Join Builder that you want to join.

You will then receive a new screen where you can define how the two tables join together. An example of the custom join screen where you establish the join conditions is below.

You will now select the join columns from both tables. In our example, Subscriber_No is the join condition for both tables. Left-click on the Subscriber_No column, and it will turn the color blue. Do this for both tables. Once this is complete, hit the blue arrow in the middle of both tables. Clicking on the blue arrow will create the ON Clause. When you see the correct ON clause, press the Add Join button on the bottom right.

Once you hit the Add Join button, you will see both tables in the Super Join Builder.
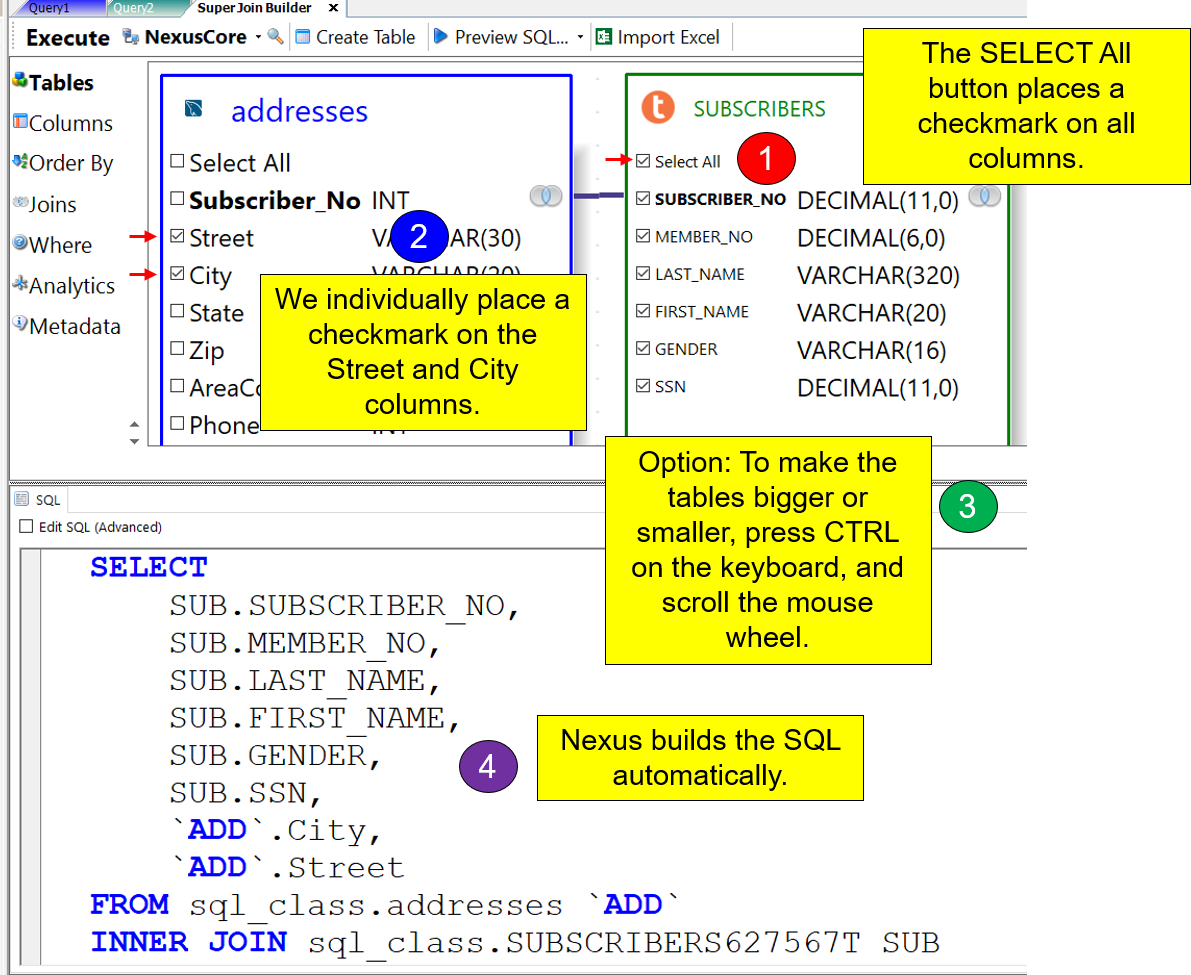
It is now time to choose the columns you want to see in your report. Our example will first SELECT All of the columns from the Subscribers table. We will then choose the City and Street columns from the Addresses table. To select columns, place a checkmark in the box just in front of the column. Check out the screenshot below to see the columns selected.
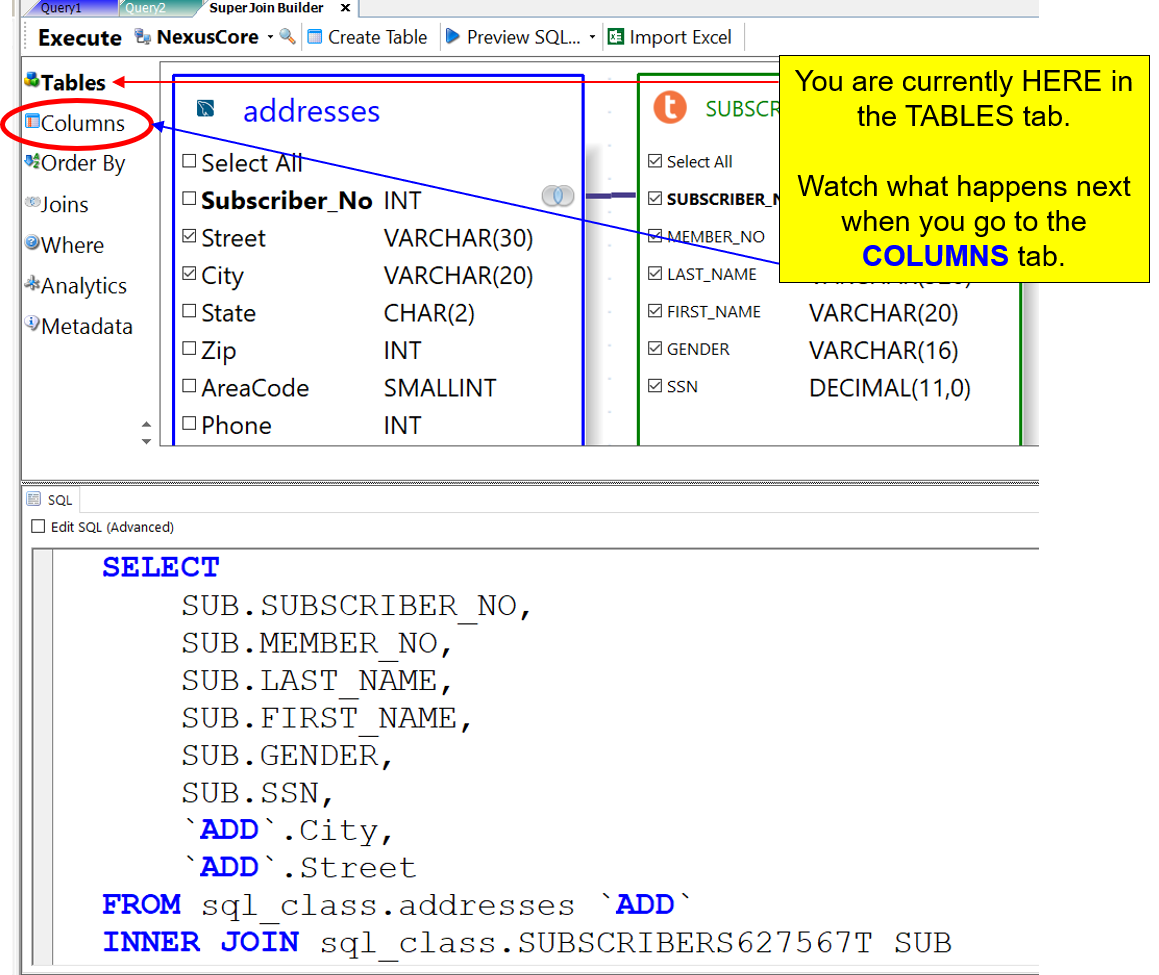
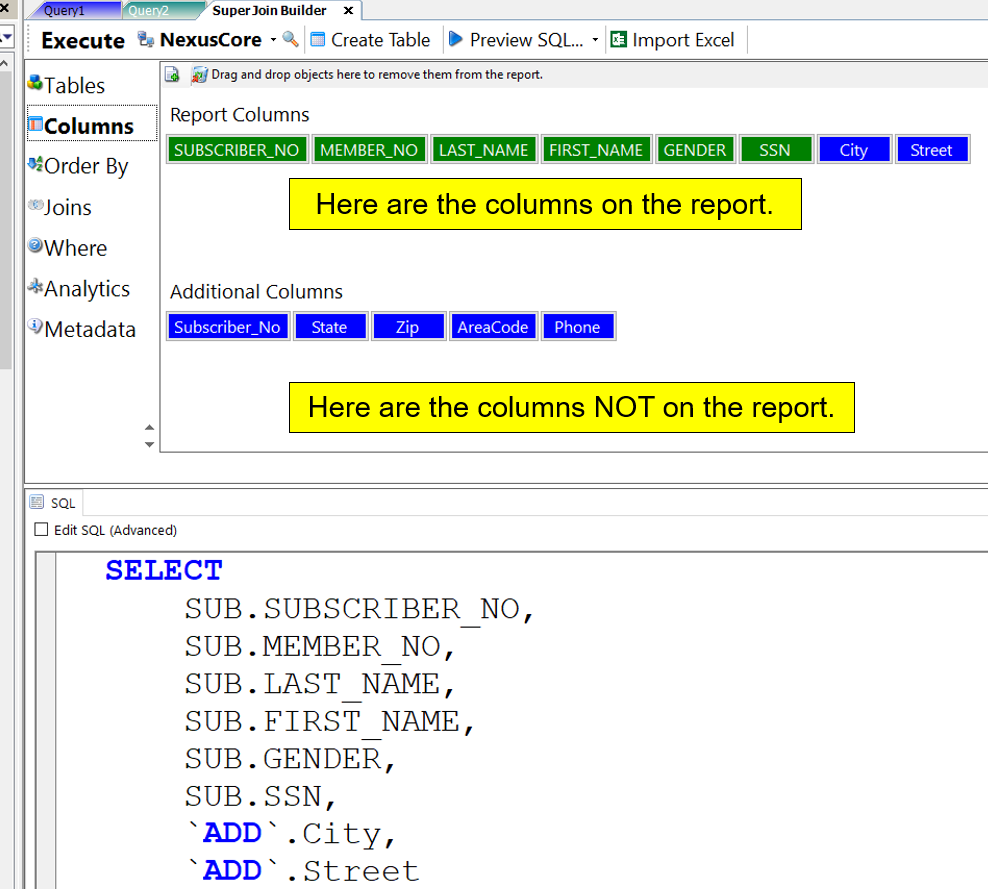
This query is ready to be executed. If you click on EXECUTE at the top left of the Super Join Builder, the query will process, and you will receive the answer set. You are currently in the TABLES tab. You can manipulate the columns on the report into a different order by using the COLUMNS tab. Left-Click on the COLUMNS tab on the far left side of the Super Join Builder. You will go from the TABLES tab and into the COLUMNS tab. The COLUMNS tab allows a user to rearrange the columns in the SELECT list. The screenshot below has a red circle around the columns tab.
Check out the screenshot below to see the COLUMNS tab. At the top of this tab, you will see the columns in the exact order they will be in the result set. The columns at the bottom are the columns you did not choose in the previous TABLES tab. In other words, you put a checkmark on the columns at the top of the COLUMNS tab, and you did not put a checkmark on the columns at the bottom.
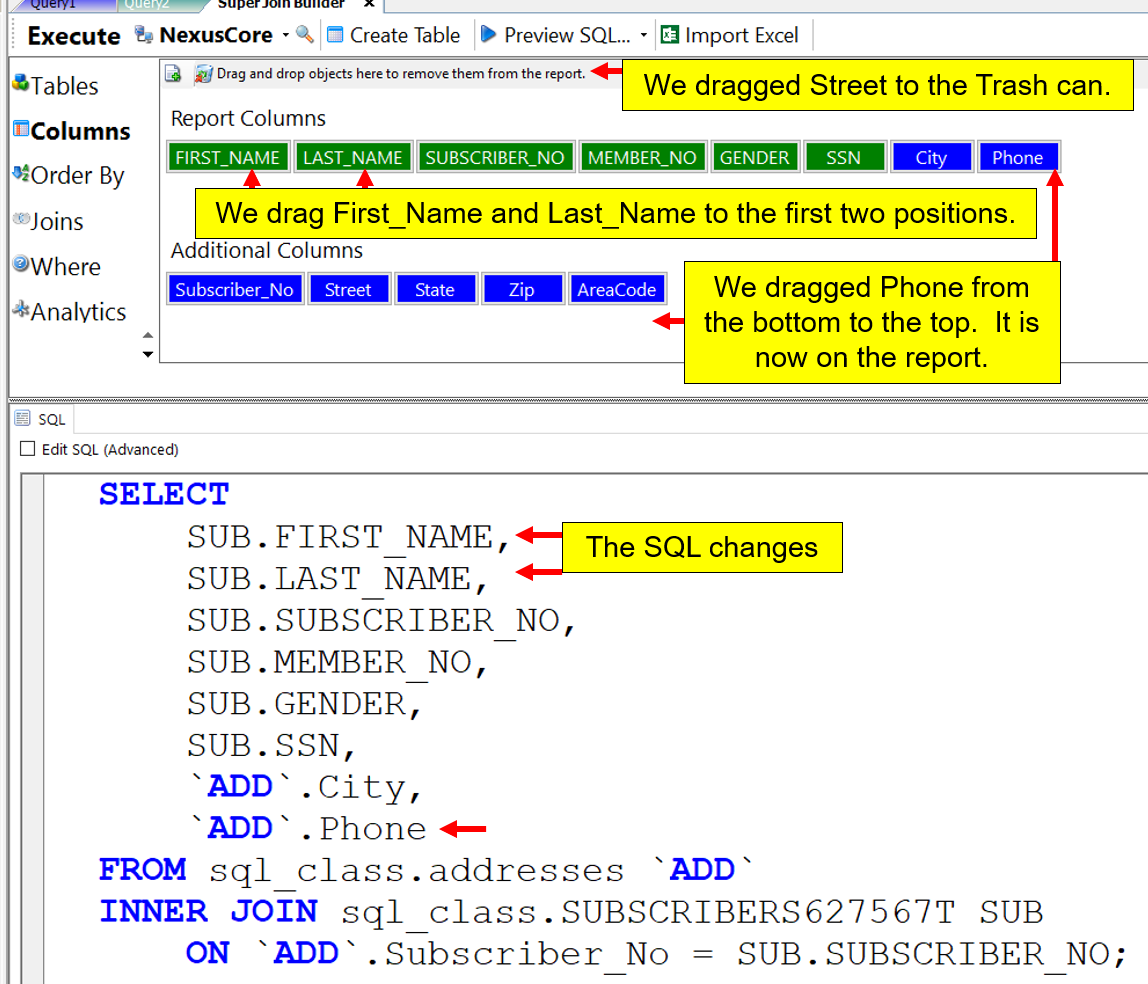
You can reorder the columns in the order you want to see them on the report. You can also drag any column at the bottom (that you did not select previously) to the top, and it will be in the report. You can also throw any columns from the top that you do not want on the report into the trash can. The SQL will change with each move you make.
In our example, we have placed First_Name and Last_Name in the first two places on the report. We threw the column Street in the trash can. We also dragged the Phone column from the bottom to the top. The Phone column will now be on the report, but the column Street will not because we dragged it to the trashcan.
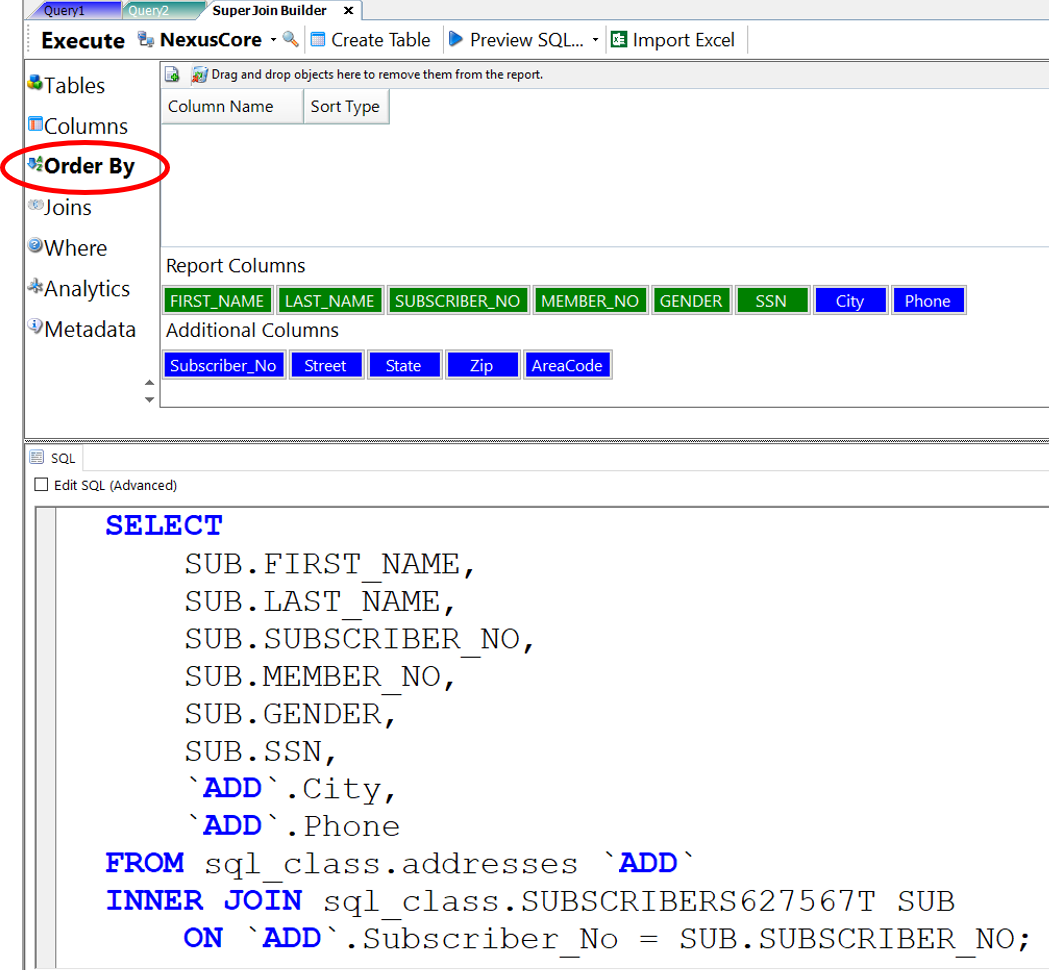
You have seen the TABLES and COLUMNS tab. The ORDER BY tab will allow you to place an ORDER BY statement in the SQL. Click on the ORDER BY tab that is under the COLUMNS tab. The next screenshot will show you where to find the ORDER BY tab.
The ORDER BY tab shows the columns on the report and any additional columns, not on the report. You can double-click on any column, or drag it to the COLUMN NAME area and that column will be used in the ORDER BY statement.
For example, I am going to order the data by three columns. The first column will be First_Name, which is the major sort. I will then add Last_Name, and then Zip DESC. To make a column DESC, you choose DESC from the dropdown. See the next screenshot below to see it in action.

The report will come back sorted by First_Name, Last_Name, and Zip DESC. You can also enhance the SQL further by using the other tabs, such as Joins tab, Where tab, Analytics tab, and see the size of the tables in the Metadata tab.
Executing the Federated Query
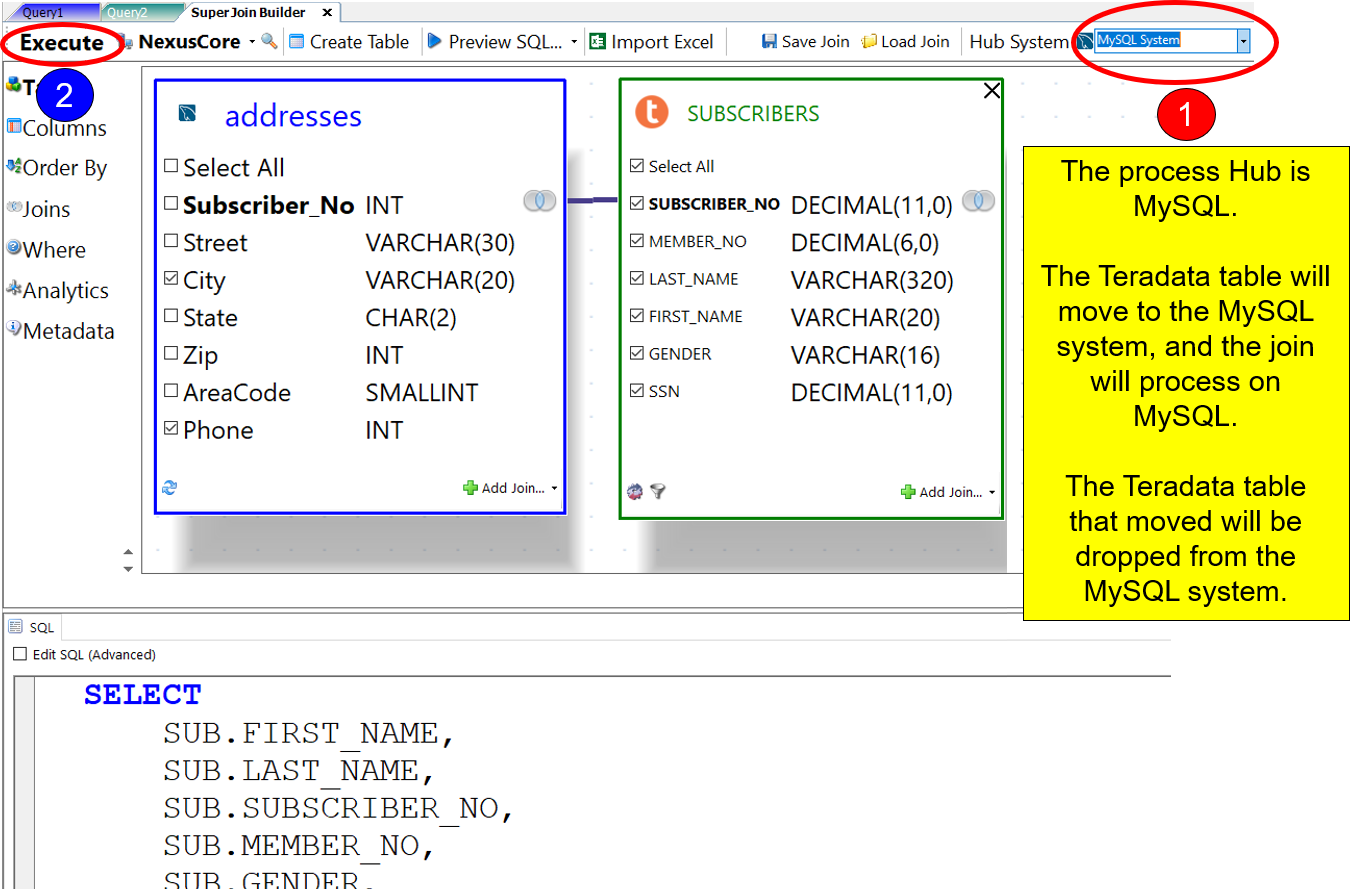
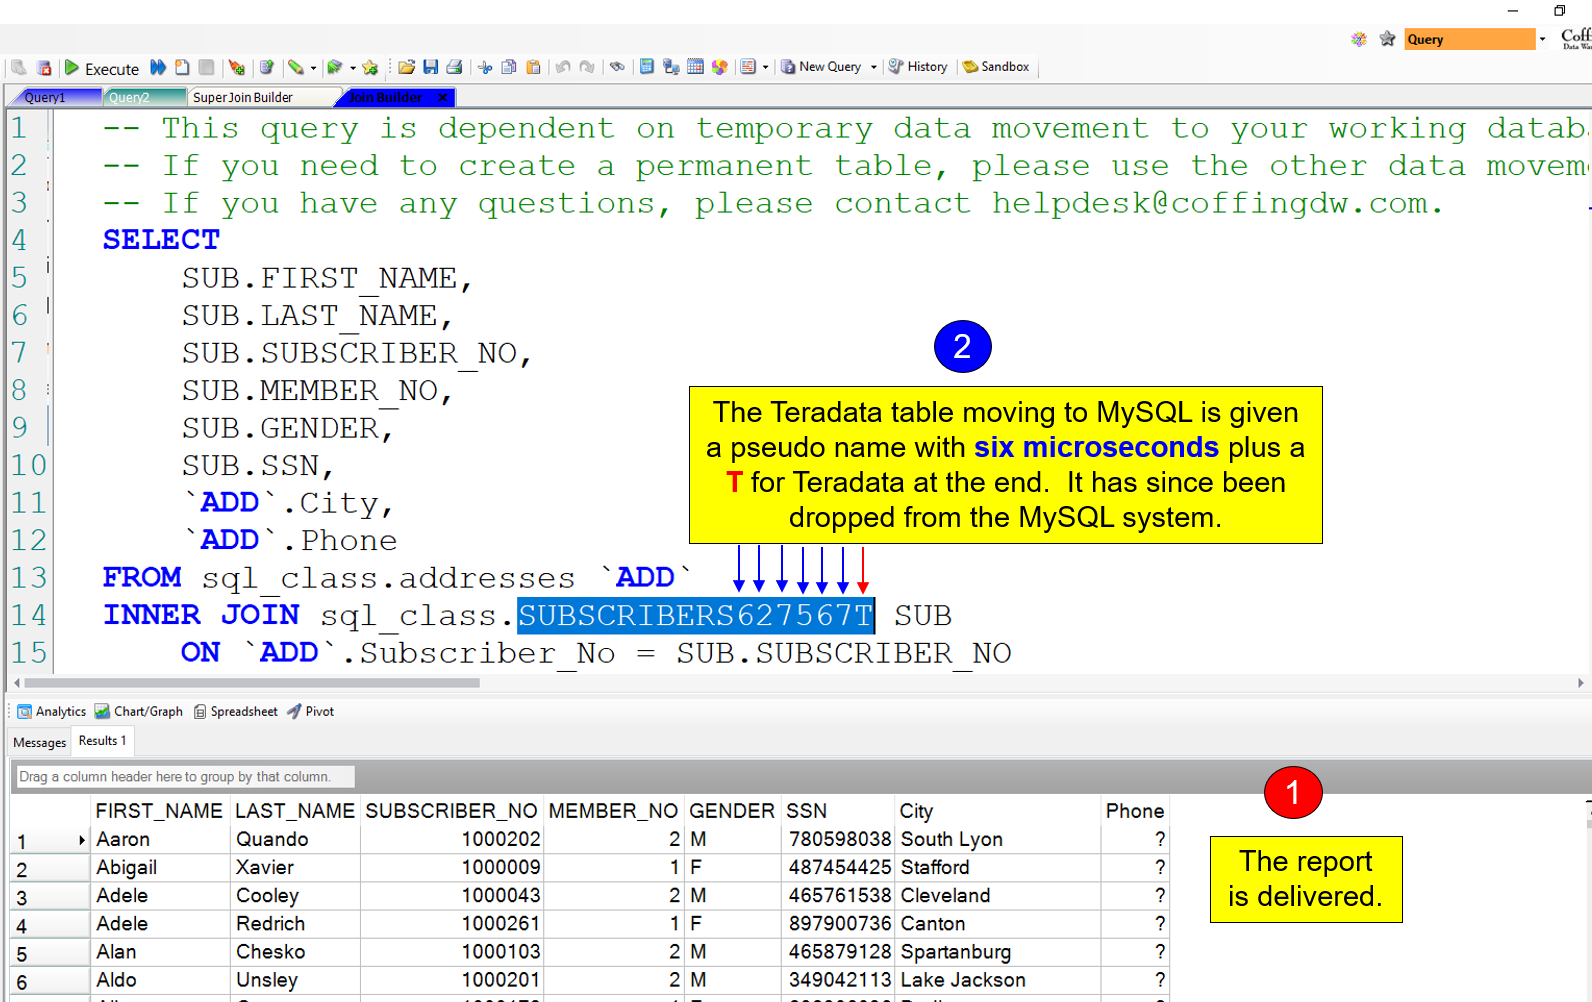
It is now time to EXECUTE the query. In the screenshot below, I am back in the Tables tab. Notice that the processing hub (top right) is MySQL. Because MySQL is the hub, this means that the Teradata table will move to the MySQL system temporarily, and the join will then perform on the MySQL system. After completion, the temporary Teradata tables will drop automatically.
The report returns to the desktop. See the screenshot below.
We can change the processing hub to perform the join almost anywhere. The Nexus will automatically change the SQL, and then move the appropriate table(s) to the processing hub.
If the Teradata table was huge and the MySQL was small, it makes more sense to make Teradata the processing hub. I am going to change the hub to Teradata, and you will see the SQL change right before your eyes.

When I press on EXECUTE in the top left corner, the report comes back perfectly once again.
Now, this is only the beginning because there are more options even more brilliant. You can’t dance with only a single step. You need versatility.
One of the best ideas for speed is to use the Nexus as the processing hub. Yes, Nexus is intelligent enough to bring back the data from all tables in the join, and then perform the join using your PC’s CPU and memory. Here is how you make that happen.
Change the processing hub to MyPC.
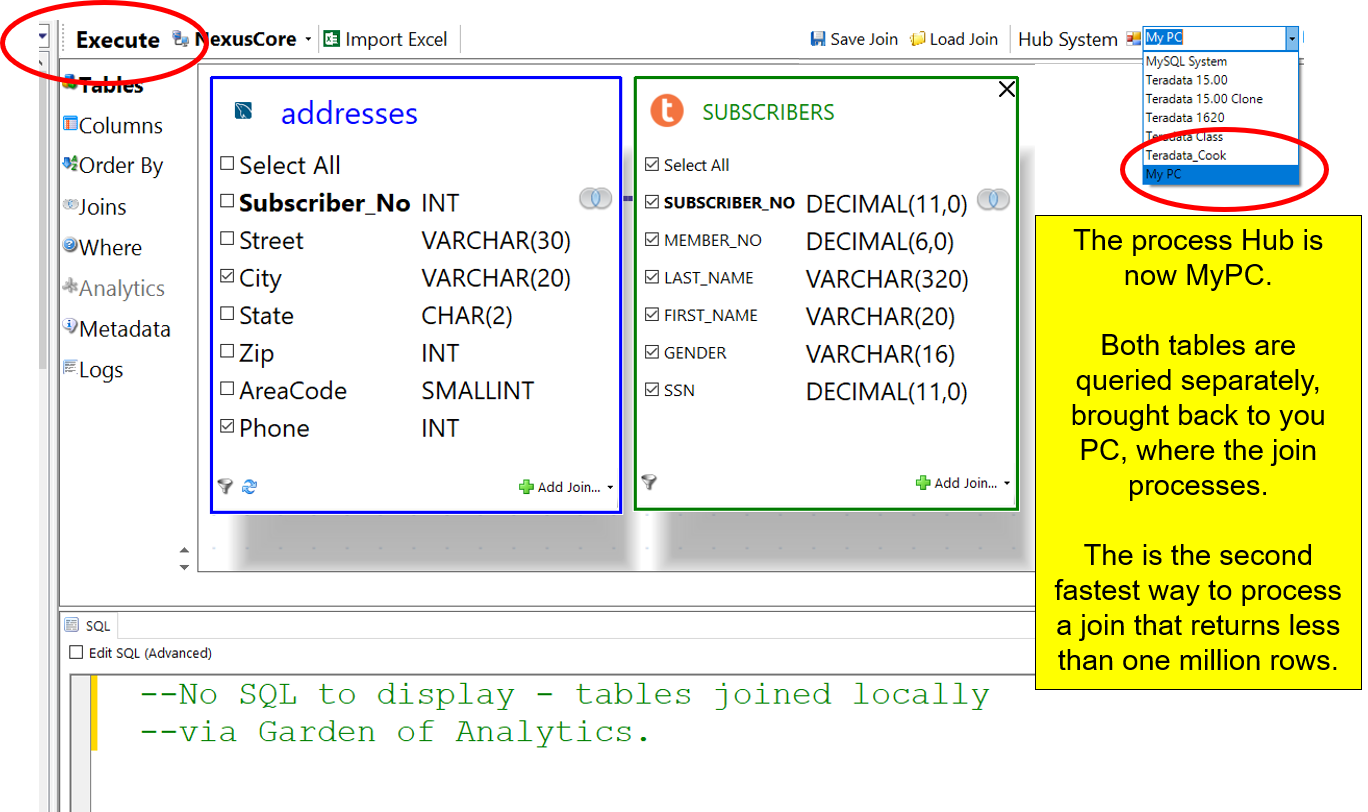
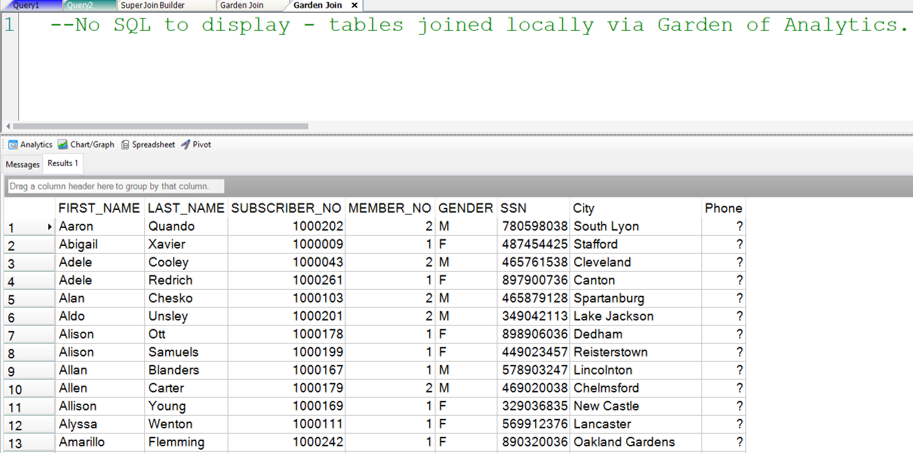
After changing the hub to MyPC, press EXECUTE. The report will come back instantly. See the report below.
Executing the Federated Query from the NexusCore Server
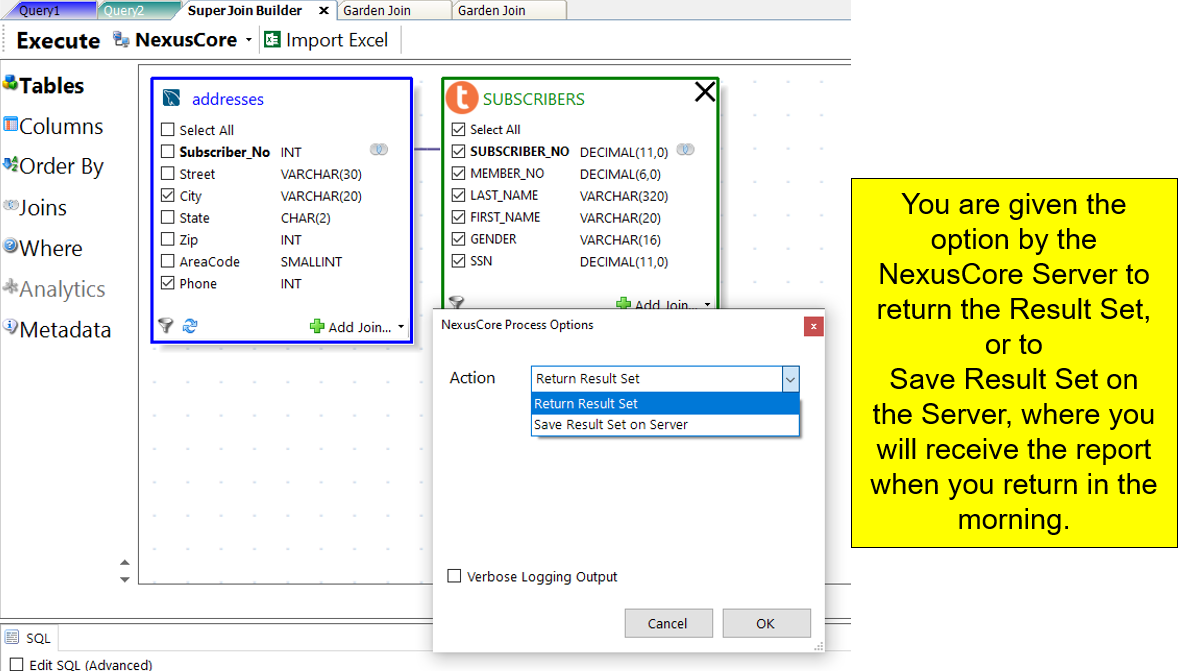
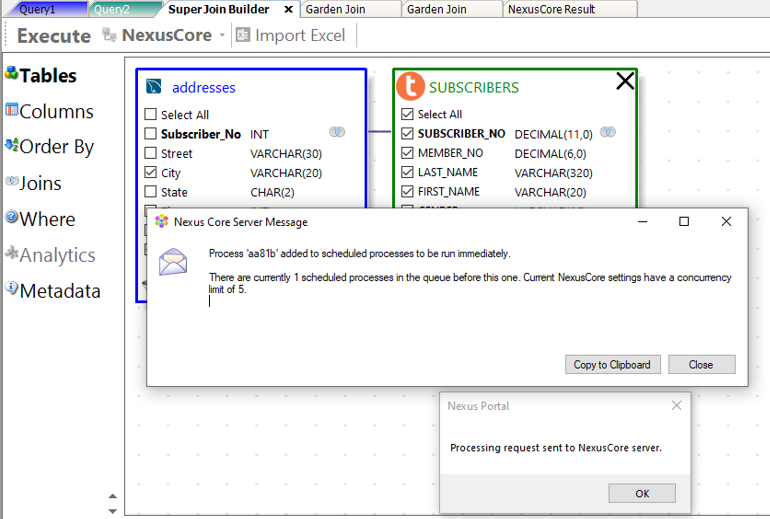
Now, for the grand finale. If you want to speed this query up even faster, you can choose the hub of MyPC, but EXECUTE from the NexusCore Server. The screenshot below shows you how to execute the query from the NexusCore Server. Your local Nexus passes your credentials to the NexusCore Server. The NexusCore Server runs the join for you, as you, which is the best way to process large joins fast.
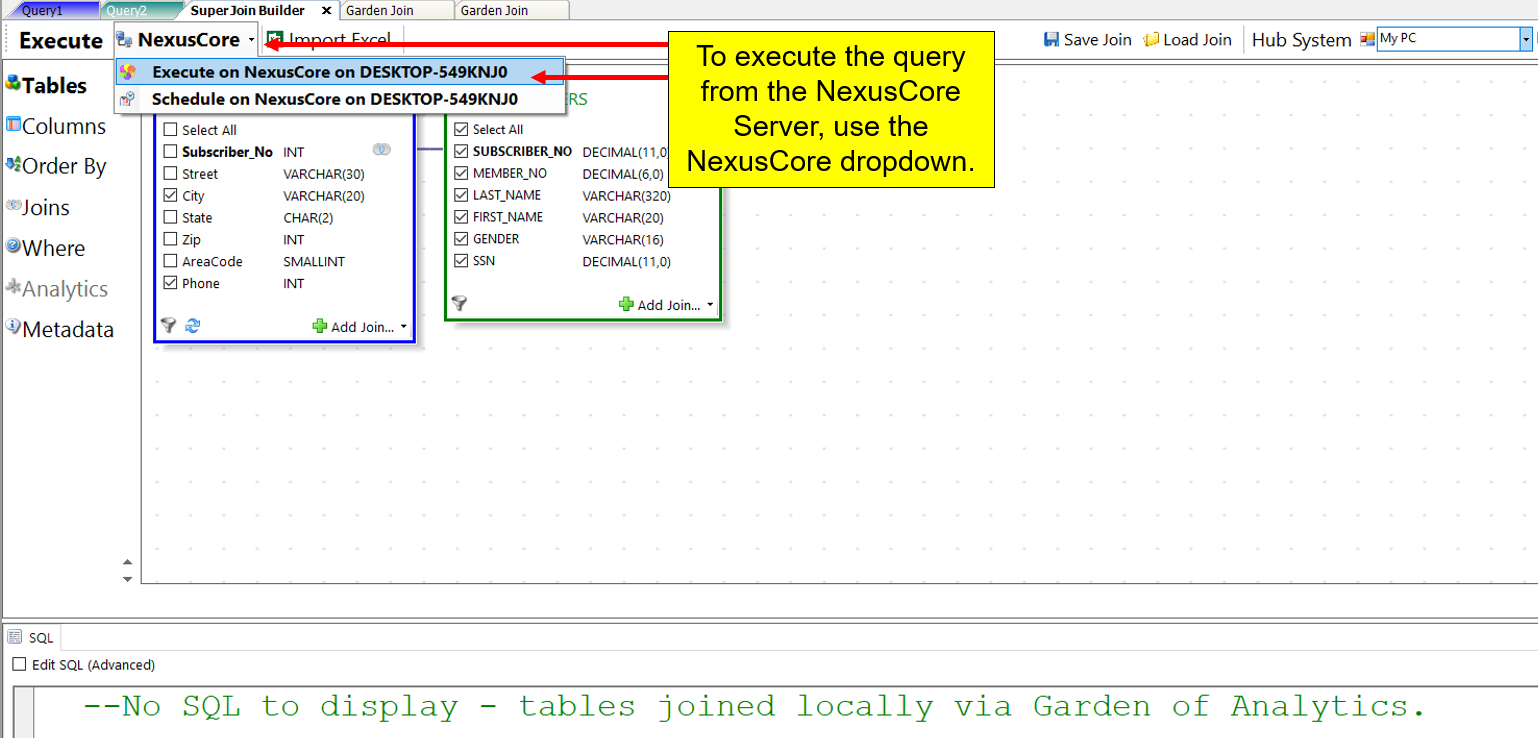
You have two options when executing from the NexusCore Server.
You will receive two confirmation messages that the NexusCore Server is ready to process the query.
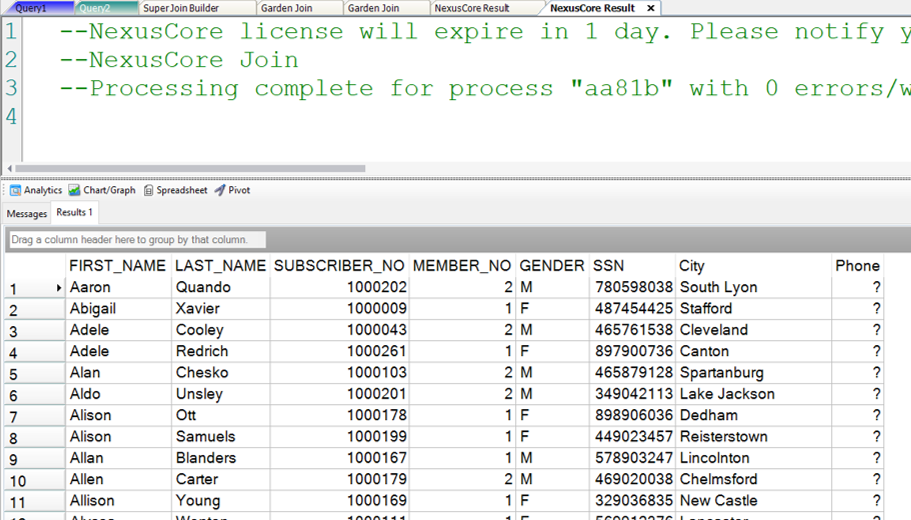
The report then returns from the NexusCore Server to your Desktop Nexus.
As I mentioned in the opening of this blow, federated queries are a combination of hardware and software working together like dance partners that make it an art.
You need software that automatically builds the SQL, converts tables structures and data types between systems, and moves data. We move data between 30 different systems in 80 different ways, depending on the database utility needed.
We process the query by allowing the processing hub to be any database platform, your PC, or the NexusCore Server.
If federated queries are on your roadmap, please give me a call.
Thank you.
Tom Coffing
CEO, Coffing Data Warehousing
Direct: 513 300-0341
Email: Tom.Coffing@CoffingDW.com
Website: www.CoffingDW.com
YouTube: YouTube/CoffingDW